

Most home baristas miss the mark on pour over coffee by overlooking simple but precise steps. You can brew a clean, flavorful cup every time by mastering water temperature, grind size, and pour technique. This guide walks you through the exact ratio, timing, and practical tips to perfect your method.
Essential Equipment Factors for Precision
Every pour over experience begins with the right tools. Without precise equipment, even the finest beans can fall short of their potential. A consistent grind, accurate water temperature, and controlled pour rate define the difference between a good cup and an exceptional one. Your gear shapes the outcome as much as technique or recipe.
You need more than just a dripper and kettle to achieve repeatable results. A digital scale ensures proper coffee-to-water ratios, while a timer helps track brew duration with accuracy. A quality burr grinder delivers uniform particles, preventing under or over-extraction. These tools work together to eliminate guesswork.
- Digital scale with 0.1g precision
- Burr grinder with adjustable settings
- Gooseneck kettle for controlled pouring
- Timer to monitor brew time
- Thermometer or temperature-controlled kettle
The consistency they provide transforms brewing from ritual to science.
Selecting the Optimal Dripper Design
Different drippers alter flow rate, contact time, and extraction even with identical techniques. The shape, material, and number of drainage holes influence how water moves through the coffee bed. Ceramic retains heat well, while plastic offers lightweight convenience and stable thermal performance. Your choice affects both temperature stability and flavor clarity.
Popular models like the Hario V60 emphasize speed and clarity with a spiral groove and single large hole. The Kalita Wave uses a flat bottom and three small holes to promote even saturation and a more balanced cup. Each design favors a specific pour strategy and grind size, so match your dripper to your taste preference.
You’ll notice brighter acidity with conical brewers and smoother body with flat-bottom styles. Experimentation reveals which design complements your beans and brewing rhythm. The right dripper aligns form and function to match your ideal cup profile.
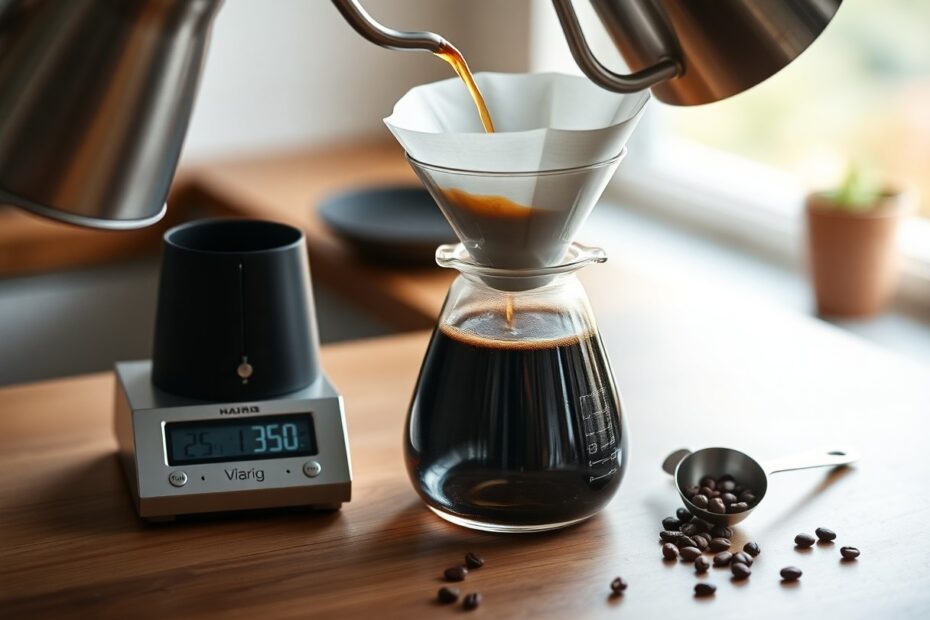
The Role of the Gooseneck Kettle
Pour control separates a muddy brew from a clean, layered cup. A gooseneck kettle’s narrow, curved spout allows you to direct water with surgical precision. This level of accuracy ensures even saturation and prevents channeling, where water bypasses coffee grounds. Consistent pouring supports uniform extraction across the entire bed.
Without this control, you risk dumping water in one spot, leading to over-extracted patches and under-extracted zones. The gooseneck’s design slows down the pour, letting you maintain a steady spiral or pulse pattern. Temperature stability matters just as much-many models offer built-in heating elements to keep water at your target degree.
You’ll feel the difference in both process and result. The deliberate pace encourages mindfulness and improves repeatability. The kettle becomes an extension of your hand, shaping flow rate and bloom dynamics with intention.
A gooseneck kettle isn’t just about looks-it’s engineered for function. Its long, thin spout reduces water flow velocity, giving you time to guide each drop exactly where it’s needed. This is especially important during the bloom phase, where gentle, even wetting releases trapped CO2 and preps the grounds for extraction. Most serious pour over brewers won’t consider a standard kettle because it simply can’t deliver the same level of control. The gooseneck supports a slower, more deliberate pour that matches the rhythm of manual brewing, helping maintain turbulence-free saturation and stable bed temperature throughout the brew cycle.
Coffee Bean Selection and Preparation
Every great pour over begins with the beans you choose. High-quality, freshly roasted coffee is non-negotiable if you want a clean, vibrant cup. Look for beans with a roast date clearly marked-ideally within the past two to four weeks-since flavor degrades quickly after roasting. Single-origin beans often shine in pour over brewing, offering distinct notes you might miss in darker or blended profiles.
You’ll want to store your beans properly to preserve their character. Keep them in an airtight container away from light, heat, and moisture. Avoid the freezer or refrigerator, as condensation can damage the delicate oils. Exposure to air is the enemy of freshness, so only grind what you need right before brewing.
Think of your beans as the foundation of your coffee experience. Their origin, varietal, and processing method all influence the final taste. Ethiopian beans might bring floral and citrus notes, while Guatemalan ones often offer chocolate and spice. Your pour over method highlights these subtleties, so choose with intention.
Identifying Freshness and Roast Profiles
Freshness isn’t just a suggestion-it’s the difference between a bright, aromatic cup and a flat, stale one. Always check the roast date, not just the “best by” date, which can be misleading. Beans reach peak flavor about 4-7 days post-roast and remain excellent for up to four weeks if stored correctly.
Roast profile shapes how your coffee will taste in a pour over. Light roasts preserve the bean’s original characteristics, often highlighting acidity and floral or fruity notes. Medium roasts balance sweetness and body, making them a favorite for many pour over enthusiasts.
You can often tell a roast level by appearance and aroma. Light roasts are drier, lighter in color, and more fragrant, while darker roasts appear oily and smell bolder, sometimes smoky. For pour over, lighter to medium roasts typically perform best, allowing clarity and complexity to emerge during brewing.
Achieving the Perfect Medium-Fine Grind
Grind size directly affects extraction, and for pour over, medium-fine is your sweet spot. Think of it like granulated sugar-fine enough to extract flavor efficiently, but not so fine that it causes over-extraction or clogging. This consistency allows water to flow at an ideal pace, usually between 2.5 to 4 minutes total brew time.
Your grinder matters more than you might expect. Blade grinders create uneven particles, leading to inconsistent extraction. A burr grinder delivers uniformity, giving you control and repeatable results. Calibrate it carefully-small adjustments can dramatically change your cup.
Test your grind by brewing and tasting. If the coffee tastes sour or weak, the grind may be too coarse. If it’s bitter or astringent, it’s likely too fine. Adjust incrementally and take notes. Over time, you’ll learn how your grinder behaves and dial in the perfect setting for your beans and setup.
A consistent medium-fine grind ensures even water flow and balanced extraction, which is imperative for highlighting the nuanced flavors in specialty coffee. Since pour over relies on precise timing and water contact, any inconsistency in particle size can lead to under or over-extracted notes. Invest time in learning your grinder’s settings-many models have numbered dials that correspond closely to this grind range. Once dialed in, stick with it for similar beans, making only slight tweaks for roast level or humidity changes.
Mastering the Coffee-to-Water Ratio
You already know that pour over coffee rewards precision, and nowhere is that more evident than in the coffee-to-water ratio. This simple relationship between grounds and liquid shapes the entire character of your brew-too little coffee and it tastes thin; too much and it becomes harsh. Getting it right means understanding how extraction works: water pulls flavor compounds from coffee at a predictable rate when variables like grind size and water temperature are stable.
Most specialty coffee professionals agree on a starting point that balances sweetness, acidity, and body. This standard ratio isn’t arbitrary-it’s been tested across thousands of brews. You’ll want to begin here before making personal adjustments. Consistency in measurement allows you to isolate changes and truly understand how each variable affects the final cup.
Once you’ve dialed in the basics, small tweaks can tailor the coffee to your taste. Whether you prefer a bolder profile or a lighter, tea-like infusion, adjusting the ratio gives you control. Use a scale for accuracy, and always record your changes so you can repeat what works.
The Standard Golden Ratio Formula
A 1:16 coffee-to-water ratio is widely accepted as the sweet spot for balanced pour over coffee. That means for every 1 gram of coffee, you use 16 grams of water. This proportion typically yields a clean, well-rounded cup with clarity and depth. It’s not a rule etched in stone, but it’s a reliable foundation for most light to medium roast beans.
You can scale this ratio easily depending on how much coffee you want to brew. For a 320-gram cup, use 20 grams of coffee. This precision ensures even saturation and consistent extraction. Digital scales and gooseneck kettles make it simple to replicate this standard every time.
Many roasters print recommended ratios on their bags, often close to 1:16. Following these suggestions respects the roaster’s intent and highlights the bean’s natural qualities. Sticking to this formula at first helps you build a reference point before experimenting.
Adjusting Measurements for Strength and Volume
If your coffee tastes weak or lacks depth, try shifting to a 1:15 or even 1:14 ratio. Using more coffee relative to water increases strength and body without making the brew bitter, as long as your grind and pour technique stay consistent. This adjustment suits those who enjoy a more intense, syrupy cup.
For a lighter, more delicate brew, extend the ratio to 1:17 or 1:18. This reduces intensity and emphasizes floral or fruity notes, especially in lighter roasts. It’s ideal when you want a refreshing, tea-like experience with nuanced flavors.
Brewing for multiple people? Scale up evenly, maintaining the same ratio across larger volumes. Just ensure your dripper can handle the amount without restricting flow. Uniform scaling preserves balance, no matter how many cups you make.
Changing the ratio is the most direct way to control strength, but it should be done thoughtfully. Altering it too drastically can lead to under- or over-extraction, even with perfect pouring. Always adjust one variable at a time-start with ratio, then fine-tune grind size if needed. This methodical approach leads to better results and deeper understanding of your coffee. Recording each change in a brewing journal helps you track what works and refine your ideal cup over time.
Step-by-Step How-to Guide for Brewing
| Step | Action |
| 1 | Boil fresh water to 195-205°F (90-96°C) |
| 2 | Grind 20g of coffee to medium-fine consistency |
| 3 | Pre-wet filter and preheat brewer |
| 4 | Add grounds, start timer, pour 40g water for bloom |
| 5 | Wait 30-45 seconds, then pour in slow spirals to 300g |
| 6 | Allow drawdown; total brew time should be 2:30-3:00 |
Pre-heating and Rinsing the Filter
Your brewer and filter need a rinse before coffee touches them. Pour hot water through the paper filter and into the carafe or mug to warm the vessel and eliminate any papery taste. This simple step stabilizes brewing temperature and ensures your coffee extracts evenly from the start.
Water sitting in the filter also begins to pre-wet the grounds more uniformly once you start brewing. Discard the rinse water completely-leaving it in dilutes your final cup. A clean, heated setup is the foundation of a balanced pour over.
You’ll notice the coffee blooms better when the environment is warm. Cold glass or ceramic pulls heat from the slurry, leading to uneven extraction. Taking 30 seconds to pre-rinse pays off in clarity and sweetness.
Executing the Bloom and Main Pours
Bloom phase starts the moment your timer does. Pour just enough water-about twice the weight of the grounds-to saturate them evenly. Watch as the coffee bubbles and expands, releasing trapped CO₂ that would otherwise block extraction.
After 30 to 45 seconds, begin the main pour in slow, concentric circles from center to edge. Keep the water level consistent, avoiding the filter walls. Pulse pouring in two or three stages helps maintain control and even saturation.
Target your total water weight by the 2:00-2:15 mark and let gravity finish the job. Aim for full drawdown by 3:00. Over-pouring or rushing leads to channeling or over-extraction, muddying the cup.
Mastering the bloom and pours transforms your brew from flat to vibrant. A proper bloom ensures gases escape so water can extract flavor evenly. During main pours, steady, controlled streams prevent turbulence that causes inconsistency. Your hand motion matters-keep it smooth, not rushed. This stage defines clarity, sweetness, and balance in the final cup.
Critical Extraction Factors to Monitor
Water temperature directly affects how compounds dissolve from coffee grounds. If the water is too hot, it risks scalding the coffee, pulling out excessive bitterness. Too cool, and the extraction falls short, leaving the cup sour and underdeveloped. Maintaining a stable range ensures balanced flavor.
Consistent pour speed and agitation shape the flow of water through the coffee bed. A fast, aggressive stream can disturb the grounds unevenly, leading to channeling. A slow, steady approach allows for even saturation and predictable extraction.
- Use water between 195°F and 205°F
- Pour in slow, concentric circles from center outward
- Stir the bed gently during bloom to ensure full saturation
Recognizing how these elements interact helps refine your method over time.
Maintaining Precise Water Temperature
Temperature stability begins the moment water leaves the kettle. Even a 5-degree deviation can shift the extraction profile noticeably. Boiling water straight from the tap often exceeds 205°F, so letting it rest 15-30 seconds after boiling brings it into the ideal range.
Different beans respond uniquely to heat. Lighter roasts typically benefit from the upper end of the temperature spectrum, around 202°F-205°F, to extract more complex sugars. Darker roasts, more soluble, do better with slightly cooler water to avoid harshness.
| Roast Level | Recommended Temperature |
|---|---|
| Light | 202°F-205°F |
| Medium | 200°F-203°F |
| Dark | 195°F-200°F |
Recognizing subtle shifts in taste helps you adjust temperature to match the coffee in your cup.
Controlling Pour Speed and Agitation
Pour speed determines how water interacts with coffee particles. A fast pour creates turbulence, which may extract unevenly or wash through channels in the bed. This often results in a mix of over- and under-extracted zones, muddying the clarity of flavor.
Agitation refers to how much the water stirs the coffee grounds during brewing. Too much movement breaks up the coffee layer, exposing fines to excessive flow. A gentle, controlled spiral pour from the center outward promotes even saturation without disturbing the bed’s structure.
Timing each pour phase matters just as much as speed. Aim for a steady pace that keeps the water level rising smoothly, avoiding sudden drops or surges. The goal is a consistent drawdown after pouring stops, indicating even extraction.
Recognizing when your pour creates too much agitation comes with practice-watch for sudden drops in water level or a sludgy texture in the final cup, both signs of disrupted flow.
Expert Tips for Flavor Calibration
Every variable in your pour over process affects the final cup, and mastering flavor calibration means understanding how each element interacts. Grind size, water temperature, and pour speed all contribute to extraction, so small adjustments can yield noticeable differences in brightness, body, or sweetness. Dialing in your brew isn’t about perfection on the first try-it’s about observation and refinement over multiple rounds.
You’ll want to keep a brew journal to track changes and their outcomes. Note the grind setting, water weight, and time for each brew, along with flavor notes like citrus, chocolate, or herbal tones. Over time, patterns emerge that reveal your preferred balance. Consistent documentation helps you replicate success and avoid repeating missteps.
Consider these key levers for tuning your flavor profile:
- Adjust grind finer for stronger body and reduced sourness
- Use slightly cooler water (around 195°F) to soften sharp acidity
- Slow your pour during the bloom to improve even saturation
- Extend total brew time by 10-15 seconds to deepen extraction
The right combination depends on your beans and taste-trust your palate above all.
Troubleshooting Bitter or Sour Notes
Bitter coffee often results from over-extraction, where too many compounds are pulled from the grounds. This usually happens when the grind is too fine, the water is too hot, or the brew time exceeds 3:30 minutes. You can fix this by coarsening the grind or shortening the pour duration to reduce contact time.
Sourness, on the other hand, points to under-extraction, meaning the water didn’t dissolve enough soluble flavor compounds. This occurs with a coarse grind, low water temperature, or rushed pouring. Try a finer grind or a more deliberate, even pour to ensure all grounds are fully engaged during brewing.
Taste is your best diagnostic tool. If the cup tastes sharp and tea-like, it’s likely under-extracted. If it’s harsh and astringent, it’s overdone. The key is balancing time, temperature, and particle size to hit the sweet spot where acidity and sweetness coexist.
Refining Technique for Consistent Results
Consistency begins with repetition and attention to detail. Each time you brew, use the same gooseneck kettle, scale, and timer to minimize variables. Even slight differences in pour height or water distribution can alter extraction, so practice a steady, circular motion starting from the center.
Pre-wetting your filter and rinsing it thoroughly prevents paper taste and stabilizes the brew environment. Make sure your coffee bed remains level throughout the process-turbulence or channeling leads to uneven extraction. A flat, even surface after brewing indicates good technique.
Over time, muscle memory develops, but don’t assume consistency without verification. Weigh every dose and measure every pour. The most reliable results come from treating each brew as both a ritual and a repeatable experiment.
Refining your technique isn’t just about following steps-it’s about developing a feel for the process. As you repeat the same motions with precision, subtle cues like the bloom’s expansion or the slurry’s movement become indicators of what’s working. This awareness, built through repeated practice, allows you to make real-time adjustments that lead to a more balanced, flavorful cup every time. Precision tools help, but your senses are the ultimate guide.
Final Words
On the whole, making pour over coffee is a rewarding process that rewards attention to detail. You control every variable-grind size, water temperature, pour rate, and bloom time-giving you the ability to shape the final cup with precision. The ideal ratio of 1:16 (coffee to water) serves as a reliable starting point, but adjusting slightly based on bean origin and roast level allows for personal refinement.
Your technique matters more than equipment. A steady, circular pour ensures even saturation, while a consistent grind from a quality burr grinder prevents under- or over-extraction. Letting the coffee bloom for 30 seconds releases trapped gases and promotes balanced extraction.
Small habits make the difference between good and exceptional coffee. Pre-wetting the filter removes paper taste and stabilizes temperature. Timing your brew keeps it within the 2:30 to 3:30 minute range for optimal strength and clarity. With practice, you develop rhythm and confidence, turning each pour over into a repeatable ritual of flavor and focus.