
Many home brewers overlook the percolator, but you can brew a rich, aromatic pot of coffee with the right technique. This guide walks you through each step, from choosing coarsely ground beans to mastering the ideal brew time, so you consistently make flavorful coffee the classic way.
Essential Factors for Percolator Success
- Use fresh, cold water for optimal extraction
- Preheat the percolator to maintain consistent brewing temperature
- Monitor the perking cycle to avoid over-extraction
Any oversight in these areas can compromise the final cup.
Selecting the Optimal Coarse Grind
Grind size directly impacts how water interacts with coffee grounds during percolation. A coarse grind prevents fine particles from slipping through the filter basket and ending up in your cup. This texture mimics sea salt and allows water to flow evenly without clogging or over-pulling bitterness.
You’ll notice smoother, cleaner results when the grind is consistent and not too fine. Inconsistent particles lead to uneven extraction-some under-brewed, others burnt from repeated cycling. Your grinder should deliver uniformity without dust at the bottom of the bin.
Think of each grind adjustment as fine-tuning a classic machine. Too fine, and the coffee turns harsh; too coarse, and it tastes weak. Dialing it in takes practice, but once set, it becomes part of your routine.
Choosing the Right Roast Profile
Roast level shapes the character of your percolated coffee more than you might expect. Medium to dark roasts stand up well to the repeated brewing cycles of a percolator, offering deeper body and reduced acidity. These profiles balance boldness without turning ashy or flat.
Light roasts often lack the structure needed for this method and can taste sour after multiple passes through hot water. The aggressive nature of percolation amplifies delicate notes in ways that don’t always flatter brighter beans. You’re better off reserving those for pour-over or drip.
Darker beans bring oils and richness that hold up under prolonged heat exposure. Their caramelized sugars and smoky depth thrive in the percolator’s rhythmic brewing motion. This synergy creates a nostalgic, full-bodied cup that defines the experience.
When dicking out beans, look for labels indicating “full city” or “Vienna” roast-these strike the ideal balance for percolation. Avoid oily, charred espresso roasts, as they can overwhelm the pot and leave a bitter aftertaste. A well-roasted bean enhances the method without fighting it.
How to Brew: The Step-by-Step Process
| Step | Action |
| 1 | Add cold water to the reservoir, filling to just below the safety valve. |
| 2 | Insert the stem into the base and place the filter basket on top. |
| 3 | Add coarse-ground coffee to the basket-about one tablespoon per cup. |
| 4 | Assemble the percolator and place it on the heat source. |
| 5 | Heat until you hear the telltale bubbling and see steam rising through the knob. |
Initial Heating and Assembly
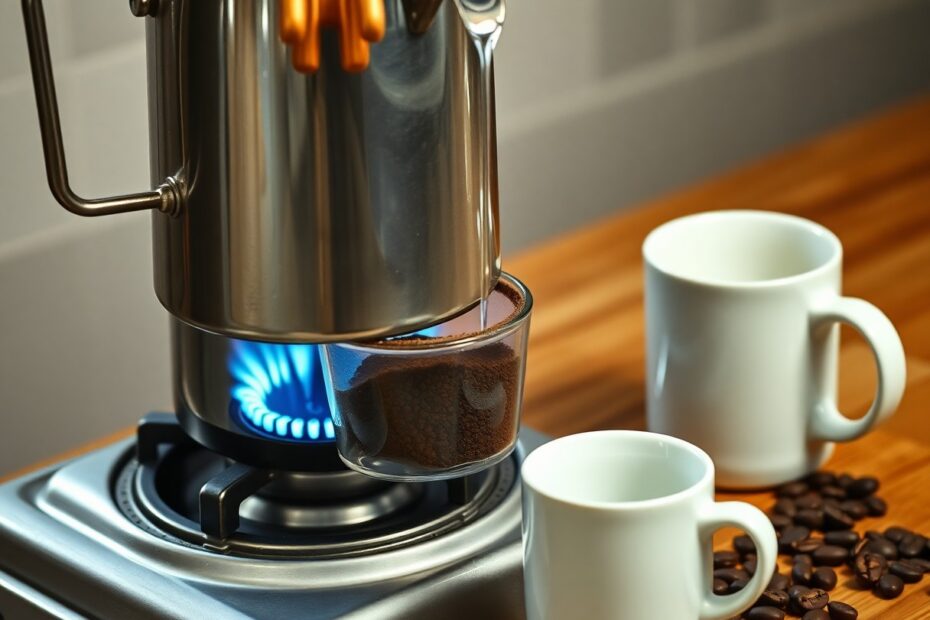
You begin by measuring cold water into the bottom chamber, ensuring it doesn’t exceed the maximum fill line near the valve. This prevents pressure buildup and potential spills during brewing. The cold start helps extract flavor evenly as the temperature rises. Once water is added, slide the central stem securely into place so it channels water upward. Next, fit the metal filter basket over the stem, making sure it sits flat. Add coarsely ground coffee-fine grounds can slip through and end up in your cup. Screw the lid on tightly, especially if using a stovetop model, to maintain consistent heat. Position the percolator on a burner set to medium heat. Too high a flame risks boiling the coffee too hard, which brings out bitterness. You’re aiming for a slow, rhythmic cycle that develops rich flavor without scalding.
Monitoring the Percolation Cycle
Your percolator starts working when water heats, travels up the stem, and sprays over the grounds in the basket. This cycle repeats, gradually deepening the coffee’s strength. Watch the clear knob on the lid-after 5 to 7 minutes, you’ll see coffee begin to pulse upward with each bubble. That’s your signal the brewing is active. Aim for a gentle, steady rhythm-about one pulse per second. If it’s too fast, reduce the heat slightly. Over-percolating leads to a harsh, over-extracted taste. Most experts recommend brewing for 7 to 10 minutes total, depending on desired strength. Lift the lid occasionally to check color, but avoid doing it too often to maintain heat. When the coffee reaches a rich amber hue, it’s ready.
Seeing the coffee rise through the glass knob gives you real-time feedback on the brew’s progress. This visual cue is one reason many prefer stovetop percolators over automated machines. You’re in full control, adjusting heat to match your taste. The aroma intensifies as the cycle continues, filling the kitchen with a nostalgic warmth. Some people like a bolder cup and extend brewing to 12 minutes, but staying within 10 minutes usually delivers balanced flavor. Once done, remove the percolator from heat and let it sit for a minute before serving. This brief pause allows grounds to settle, resulting in a cleaner pour.
Mastering Temperature and Timing
| Factor | Optimal Setting |
| Water Temperature | 195°F to 205°F (90°C to 96°C) |
| Brewing Duration | 7-10 minutes for full-strength coffee |
| Heat Source Setting | Medium-low on stovetop or low on electric |
Regulating Heat for Consistency
You control the quality of your brew by managing the heat source carefully. A percolator relies on continuous cycling of near-boiling water through the coffee grounds, and too much heat disrupts this rhythm. If the temperature climbs too high, the water boils aggressively, extracting bitter compounds and scalding the coffee. Instead, aim for a gentle, steady percolation where bubbles rise slowly and consistently. This allows balanced extraction without harshness. Electric models often have built-in thermostats, but stovetop versions require your attention. Watch the perking action through the glass knob-steady sputtering means you’re on track. Adjust the burner as needed to maintain a calm rhythm, avoiding rapid, forceful bursts.
Determining the Ideal Brewing Duration
Your taste preferences shape how long you let the percolator cycle. Most traditionalists agree that 7 to 10 minutes delivers a rich, full-bodied cup without tipping into bitterness. Start checking around the 7-minute mark by lifting the lid slightly and observing the color of the brew. A deep amber hue signals readiness. The number of perking cycles-those visible spurts through the central tube-also helps gauge progress. Roughly one cycle every 20-30 seconds means you’re on pace. Over-brewing leads to astringency, so resist the urge to leave it unattended. When the sound slows and the aroma deepens, it’s time to remove the pot from heat.
Timing isn’t just about minutes-it’s about rhythm and sensory feedback. Each percolation pass extracts more flavor, so stopping too soon yields weak coffee, while going too long overwhelms the palate. Trust your nose and eyes as much as the clock. With practice, you’ll recognize the moment the brew reaches its peak.
Pro-Tips for a Smoother Cup
Perfecting your percolator brew means paying attention to small details that make a big difference. Using coarsely ground coffee prevents fine particles from slipping through the metal basket, reducing grit in your cup. Keep the percolator away from high heat-let it cycle gently to avoid boiling the coffee, which brings out bitter notes. Timing matters; most models need 7 to 10 minutes depending on desired strength.
- Always pre-rinse the filter basket to remove any metallic taste
- Fill the tube and chamber properly to ensure consistent cycling
- Listen for the bubbling rhythm-steady pulses mean optimal extraction
Knowing how your stove interacts with the pot helps maintain control. Electric coils retain heat longer than gas, so adjust the flame or setting midway through brewing. Let the coffee rest for a minute after brewing stops before pouring. This pause allows grounds to settle and flavors to mellow.
Utilizing Paper Filters to Reduce Sediment
Placing a paper filter inside the metal basket cuts down on sediment significantly. These filters trap the tiny coffee fines that typically pass through the perforated basket. While traditionalists prefer the full-bodied texture of unfiltered percolator coffee, many modern users appreciate the cleaner mouthfeel a paper liner provides.
You’ll find cone-shaped paper filters that fit most standard percolators at grocery or specialty stores. Make sure the filter sits flat and covers all openings in the basket before adding coffee. This simple swap doesn’t alter the brewing method-just refines the result.
Some users tear the edge slightly to improve water flow if they notice slow percolation. The paper adds a minimal cost but extends enjoyment, especially if you dislike gritty residue at the bottom of your cup. Knowing
The Importance of Using Filtered Water
Water makes up over 98% of your coffee, so its quality directly shapes the taste. Tap water with high mineral content or chlorine can introduce off-flavors and even damage your percolator over time. Using filtered water ensures a clean base that lets the coffee’s natural notes shine through.
Hard water often leads to mineral buildup inside the stem and chamber, reducing efficiency and altering heat distribution. A simple pitcher filter or faucet attachment removes impurities without stripping crucial minerals that support extraction. This small step prevents bitterness and extends the life of your pot.
Coffee brewed with filtered water tastes brighter and more balanced, especially with light or medium roasts. Knowing
Filtered water enhances aroma and clarity, making subtle flavor notes more perceptible. It also reduces scaling, which can clog the central tube and disrupt the percolation cycle. Over time, this maintenance benefit saves you from deep cleaning or premature replacement.
Cleaning and Maintenance Guidelines
Always disassemble your percolator immediately after use to prevent coffee oils from drying and hardening. Rinse all parts with warm water before residue sets in, especially the basket, stem, and lid. Hand-washing with mild dish soap preserves the metal finish and avoids damaging any vintage finishes or coatings.
Never place the percolator’s base or lid in the dishwasher unless the manufacturer explicitly approves it. High heat and harsh detergents can warp metal components or degrade seals over time. Instead, wipe the exterior with a damp cloth and dry thoroughly to prevent rust or spotting.
Store your percolator with the lid slightly ajar to allow airflow and reduce moisture buildup. This simple habit prevents musty odors and keeps gaskets from sticking. Regular cleaning after each brew ensures your next pot tastes fresh, not stale.
Deep Cleaning to Prevent Bitter Residue
Bitter coffee often traces back to old oils baked onto metal surfaces during repeated brewing cycles. Run a mixture of equal parts white vinegar and water through a full percolation cycle once a month to dissolve these deposits. Let the solution cool, then dump it and rinse thoroughly with fresh water.
Pay close attention to the lower chamber and the inside of the stem tube, where residue accumulates most. Use a soft bottle brush to scrub hard-to-reach areas without scratching the metal. Avoid steel wool or abrasive pads that can damage the surface and trap future grime.
After cleaning, brew a pot of plain water with no coffee to flush out any lingering vinegar taste. This final rinse ensures your next brew remains pure and aromatic. Consistent deep cleaning keeps your percolator performing like new, even after years of use.
Inspecting the Stem and Basket for Wear
Check the percolator’s central stem regularly for cracks, warping, or mineral buildup that can disrupt water flow. A damaged stem prevents proper cycling, leading to weak or over-extracted coffee. Look for any discoloration or pitting, especially near the bottom where it connects to the base.
The basket should sit securely over the stem without wobbling or gaps. Over time, repeated heating and cooling can bend or corrode the perforated screen, allowing grounds to escape into your brew. Replace it if holes appear enlarged or jagged.
Ensure the basket’s spring-loaded lid snaps shut firmly and aligns with the stem’s top opening. A loose fit allows coffee to bypass filtration, resulting in a gritty cup. These small details make a big difference in extraction and clarity.
Over time, metal fatigue can compromise the basket’s structural integrity, especially in older models. If you notice the sides bowing or the base separating during brewing, it’s time for a replacement. A compromised basket not only affects flavor but can also create a safety hazard from uneven heating. Keep spare parts on hand if your model is vintage or hard to source.
Conclusion
You now hold the knowledge to brew coffee the way generations before you did-simple, reliable, and full of character. The percolator rewards patience and attention, delivering a bold cup that reflects your timing and care. Each step, from measuring the grounds to monitoring the brew cycle, shapes the final flavor in your mug.
Mastering this method means understanding how heat and circulation extract flavor over time. You control the strength by adjusting the brewing duration and the coarseness of the grind. Unlike modern machines, the percolator demands presence, inviting you to listen for the telltale gurgle that signals progress.
There’s satisfaction in using a tool that needs no electricity, no filters, just heat and water. You connect with a tradition that values process over convenience. When done right, your percolator brew stands as a testament to timeless craftsmanship.